


Last year, a site called Freedom Mobiles compiled a list of more than 130 keywords to identify the most common iPhone issues by searching Google. They shared search issues in the UK, US and around the world, and the article is a really interesting read. Today I've decided to take this global list and explore each of the 10 most common problems and share with you how to fix them. That way, if you're faced with one of these problems, you'll be able to find a solution, and if not, you'll know what to do if any of them ever happen to you.
10 - AirPods don't connect
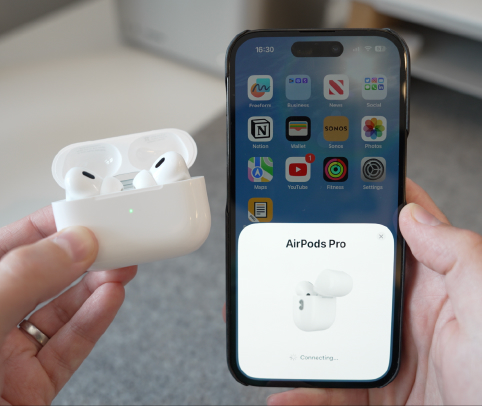
In tenth place is the problem when AirPods don't connect to the iPhone. First of all, the most obvious place to start is to make sure your AirPods and case are fully charged. Place your AirPods in a case and connect it using a Lightning cable rather than relying on wireless charging. Then, gently clean the case to ensure that the AirPods themselves can connect and charge properly.
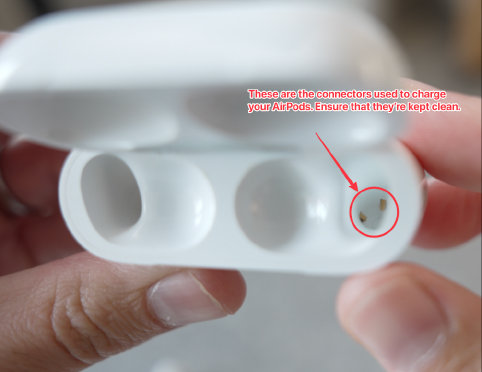
If you look inside the case, you'll notice two golden connectors at the bottom of each tip of the AirPods case. They are the ones that connect to the AirPods themselves to provide charging. If they're covered in dust, dirt, earwax, sand, or something else, there's a chance the AirPods won't be able to establish a reliable connection and won't charge. Cotton sticks are great for cleaning AirPod cases. If necessary, they can be slightly moistened with a cleaning solution and then let the case sit open for a while to allow the connectors to dry completely. It goes without saying that you should never immerse the case or AirPods under water, or even keep them under running water, except with a small amount of non-abrasive cleaning solution.
If the problem persists, the next step is to reset the settings. Place the AirPods in the case and close the lid, then wait for 30 seconds. On your iPhone, go to the section “Preferences”, then Bluetooth and find yours AirPods. Click on the “i” button next to them, and on the next screen, select “Forget this device”, which will completely disconnect them from the phone.

Then open the charging case, press and hold the setup button on the back until the status indicator flashes amber and then white. Your AirPods are now in pairing mode, so keep them with the case open next to your iPhone. Your iPhone should recognize the AirPods and you'll be able to follow the steps to connect to them, which will hopefully fix the connection problem.
This process is called auto-connect, and you can connect manually if you want. To do this, follow all the previous steps, but instead of waiting for the prompt to appear on the iPhone screen, open Bluetooth and find the headphones there, then tap on them to connect them manually. Also, make sure you have the latest version of iOS and if you haven't already, restart your phone.
Honestly, the steps outlined here should fix the issue. There are also more extreme measures you might consider, like completely removing all Bluetooth connections from your phone or even resetting it to factory settings, but I'd be more likely to contact Apple support before doing any of this and see if they can help fix what's clearly a more difficult problem, or even replace the AirPods for you.
9 - CarPlay doesn't work
In ninth place was the problem with CarPlay not working, so let's figure it out. The initial step in addressing CarPlay issues is to determine whether this is a major or minor connectivity issue. Sometimes it happens that the phone simply does not connect, and to solve this problem it is enough to restart the car's multimedia system and restart the phone, so you should always start with this simple method. With many years of experience using CarPlay, I can safely say that this simple step has always solved the problems that arise, although it is annoying to have to sit on the side of the road and wait for the phone to restart.
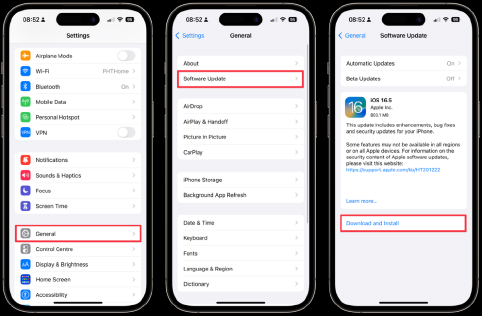
However, if this method did not solve the problem, it is likely that we are talking about more serious connection problems, but we can still take steps to fix them. First of all, as always, make sure your iPhone has the most recent version of iOS by going to Settings > General > Software Update.
Also, this might sound obvious, but it's still worth checking the manufacturer of your car or head unit to make sure your car actually supports CarPlay, rather than just assuming it, as not all cars offer this feature. After that, determine what type of CarPlay connection you're using.

If the device is wired, then you connect to the car via a USB or USB-C to Lightning cable, which is the first thing I would check. Lightning cables don't last forever, and if the cable is in your car for a long time, possibly months or even years, exposed to extreme temperatures and frequent twisting and bending, there's a chance that the cable will fail. So try using a different cable. Moreover, if your car has multiple USB ports that support CarPlay connectivity, connect to different ports and mix and match them until you've ruled out all options.
If your connection is wireless, make sure your phone has Bluetooth and Wi-Fi enabled. I would also recommend resetting your CarPlay connection by going to Settings > General > CarPlay, then tapping on the car and selecting “Forget this car”. You will then be able to reconfigure CarPlayby following the instructions for your car or head unit.
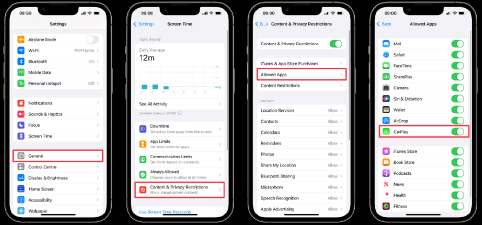
Finally, check to see if your iPhone is not restricting access to CarPlay. Go to Settings > Screen Time. If it's on, go to the section “Content and Privacy Restrictions”, click on “Allowed apps” and make sure CarPlay included. If you don't have content and privacy restrictions enabled, you don't have to worry about this issue.

8 - iPhone does not turn on
In paragraph 8, your iPhone does not turn on. The first thing we'll check is that the iPhone has enough power to turn on, because if the battery runs out to a certain level, you won't be able to turn on or restart your phone without connecting it to the network. So get the cable USB-Lightningthat you know works, connect it to power supply, which you know works too, and connect it to the network. An iPhone with the latest version of iOS actually turns on automatically a few seconds after connecting to the network, so it's possible that this is the only way to solve your problem.
However, if not, you can try a forced reboot. For all phones, connect them to power for at least 20 minutesbefore you try it. On iPhone 6S and older, hold down the sleep/wake buttons (the button on the right) and the Home button (the front panel button at the bottom) for 20-30 seconds. On the 7 and 7 plus models, do the same, but with the volume down button (on the left side of the phone) and the Home button. On iPhone 8 and newer models, you'll be pressing a quick sequence of buttons. Press and quickly release the volume up button, then do the same with the volume down button, and then press and hold the power button until the Apple logo appears. Check out this guide if you want more information on how to do this.
If this still doesn't work, you can try restoring your iPhone using iTunes, but you'll need a Mac or Windows PC to do that. Download iTunes to the computer you're using, and then connect your iPhone to your computer using a Lightning-HUSB cable. Follow the steps we just talked about in the previous section about force rebooting, but do it with your phone connected to your computer. This is necessary in order to put the phone into recovery mode, and then follow the steps in iTunes to update or restore the iPhone.
If none of these steps have worked, you'll need to contact Apple Support.
Number 7 is the “Liquid detected in the Lightning connector” message on your screen.

Did you know that if you have an iPhone 12, 13 or 14, it is waterproof, with an IP68 rating? This means that it can be submerged in water up to 6 meters deep for 30 minutes. I was aware of this fact, but I confess I forgot because I never let my iPhone get wet. Honestly, I would recommend that you avoid submerging your phone in water as well. Unlike your Apple Watch, for example, the iPhone is not designed for bathing. The iPhone's waterproof function essentially serves to protect it in case you accidentally drop it into water. If this ever happens and you try to connect a Lightning cable, there's a chance you'll get a message that your Lightning port contains water.
To fix this problem, first of all, disconnect your iPhone from the network and leave it somewhere to dry. Don't put it in rice, despite the fact that this tip has been used for many years by people who believe that rice absorbs moisture better. Research has shown that, firstly, this is not entirely true - air drying is much more effective. Secondly, you run the risk that small particles of rice dust will get inside your phone along with water. So, the solution is simple — leave your phone somewhere to dry before you do anything else. If after some time you are sure that the iPhone is dry but the error message still appears, try using a different Lightning cable first. If this doesn't help, contact customer support.
6 - Virus on iPhone

The term “iPhone Virus”, which can be translated as “virus on the iPhone,” is often used by people who suspect that their iPhone is infected with malicious software. However, let's get to the bottom of this issue quickly. The good news is that overall, I can say with confidence that your iPhone is most likely virus-free, and there are several reasons for this.
First, it is more difficult for hackers to create effective viruses on the iPhone than, for example, on Android devices or Windows PCs. This is mainly due to the fact that Apple has created its own App Store and closely monitors all apps that go there.
Secondly, if you don't jailbreak (hack the operating system for full access), take reasonable precautions, such as not clicking on questionable links or visiting suspicious sites, and updating your operating system in a timely manner, you will be completely safe when using your iPhone.
However, it is impossible to completely rule out the possibility that your iPhone may have a virus. There are certain symptoms that may indicate this problem:
- the phone is constantly heating up;
- the battery is discharged very quickly;
- Unfamiliar apps appear on the home screen.
If you notice these signs, it might be worth checking your device more thoroughly for malware. But in most cases, subject to basic security rules, your iPhone is reliably protected from viruses and other threats.
5 - iPhone does not charge
If your iPhone doesn't charge, you really need to isolate and test every element of the charging process to identify and fix problems. Let's take an example with my iPhone 14 Pro and focus on charging via the Lightning cable.
At first glance, it may seem that only one physical element is involved in this process - the Lightning cable itself. But that's actually not the case. If we move back from the phone, we have:
1. The iPhone itself
2. Lightning port at the bottom of the phone
3. Lightning cable
4. Power supply
5. Wall socket
Do not forget that the chain may contain additional elements, such as extension cords or surge protectors. The key point is that to successfully charge your phone, all of these components must work perfectly. If at least one of them is faulty, the whole chain is broken.
Therefore, while this may be annoying, it is necessary to isolate and test each element. Try using different cables, sockets, charging blocks. Check and clean the Lightning port on your phone if necessary. I would recommend using a clean, dry toothbrush for this purpose. See if any of these help solve the problem.

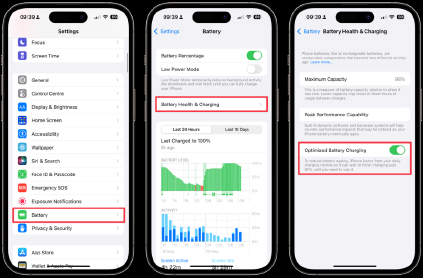
We should also mention the situation when your iPhone stops charging by 80%. Some may mistake this for a phone problem, but it's actually a regular feature. The iPhone has an option “Optimized battery charging” (Optimized Battery Charging), which uses the phone to try to reasonably predict how long you're going to leave it on charge based on your habits. It quickly charges the battery up to 80%, but then pauses charging until you most likely want to use it. This is to extend battery life and I would recommend keeping this feature on. If you wish, you can turn it off in Settings: go to “Battery“, then “Battery health and charging” and turn off the corresponding switch.
4 - The iPhone is stuck on the Apple logo
If your iPhone is stuck on a screen with the Apple logo on it, there are a few steps you can take to fix this problem.
First of all, as recommended by Apple, you need to make sure that the progress bar has not moved for more than an hour. Unfortunately, there's not much you can do here except mentally memorize the position of the indicator, leave the phone plugged in, and then come back after a while to check if the bar has moved. It may seem strange, but Apple claims that if you restore your phone from a backup copy or switch from a previous device, it is not uncommon for the iPhone to get stuck on this screen for a long time while all the necessary processes are running in the background.
If you are sure that your phone is stuck on this screen for more than an hour, you need to transfer it to recovery mode.
Connect your iPhone to a Windows or Mac computer, and then follow these steps depending on the model:
- For iPhone 6s or older: Press and hold the sleep/wake button and the Home button until the recovery mode screen appears.
- For iPhone 7 or 7 Plus: Press and hold the volume down button and the sleep/wake button until the recovery mode screen appears.
- For iPhone 8 or later: Quickly press and release the volume up button, then the volume down button, and then press and hold the side button until the recovery screen appears.
Open iTunes and use it to update or restore your device. If you need more help with recovery mode, check out Apple's official guide.
3 - Face ID doesn't work
If Face ID doesn't work on your iPhone, try this:
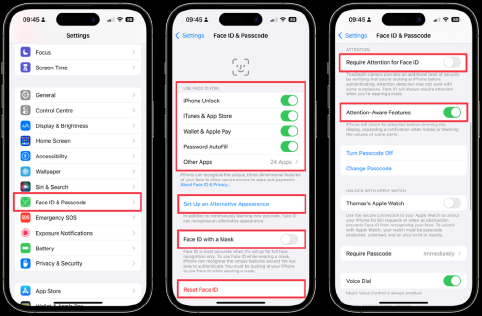
- Check your Face ID settings. Go to Settings > Face ID et passcode. Make sure that everything you need for Face ID to work is included here. This may seem obvious, but people often complain about a broken Face ID, but it turns out that they accidentally disabled an important setting.
- If Face ID does not work in a particular app, go to the section “Other apps” and make sure the right app is turned on.
- Use the option “Customize an alternative appearance”to add another sample of your face. This can help if you're having trouble recognizing on a regular basis.
- Include “Face ID with mask”, if you think that wearing a mask is causing the function to malfunction.
- Disable the option “Demand attention” for Face ID. If this feature is enabled, you must look directly at the phone for Face ID to work. Turning it off often helps solve the problem if you're wearing sunglasses, for example. Note that this reduces Face ID security, but for most users, the level of protection remains sufficient.
- If none of the above works, try resetting Face ID and setting it up again.
- Make sure that the Face ID sensors at the top of the phone are not obstructed by anything. This may be a cover, dirt or soot. Gently wipe the area with a microfiber cloth.
If the problem persists after all these steps, there may be a hardware problem. If so, contact Apple Support or an Authorized Service Center.
2 - Forgot your iPhone passcode

If you've forgotten your iPhone password and can't remember it after multiple attempts, the only solution is probably to erase your phone and set it up again. To do this, you must transfer your iPhone to recovery mode.
Connect your phone to a Windows or Mac computer, and then follow these steps depending on the model:
- For iPhone 6s or older: Press and hold the sleep/wake button and the Home button until the recovery mode screen appears.
- For iPhone 7 or 7 Plus: Press and hold the volume down button and the sleep/wake button until the recovery mode screen appears.
- For iPhone 8 or later: Quickly press and release the volume up button, then the volume down button, and then press and hold the side button until the recovery screen appears.
Open iTunes and use it to update or restore your device. If you need more help with recovery mode, please contact official management from Apple.
1 - iPhone doesn't connect to iTunes
Finally, we move on to problem number 1. If a message appears on your phone screen “iPhone is off, connect to iTunes” (iPhone is disabled, connect to iTunes), the solution would also be to restore the iPhone via recovery mode.
This message appears when you enter the wrong password too many times. This is an iPhone security feature designed to protect your data from unauthorized access. If you enter the wrong password enough times in a row, the iPhone will temporarily block you, but this will eventually result in a permanent ban.
If this happens, you need to try to restore your phone via iTunes. Connect your iPhone to your Windows or Mac computer and follow these steps:
- For iPhone 6s or higher: press and hold the button sleeping/waking and a button “Home” before the recovery mode screen appears.
- For iPhone 7 or 7 Plus: press and hold the button reducing the volume and a button sleeping/waking before the recovery mode screen appears.
- For iPhone 8 or later: press and release the button quickly increase the volume, then the volume down buttonand then press and hold side button before the recovery screen appears.
You will then be able to use iTunes to restore the device. Note that all data on your phone will be erased, so it's important to back up regularly. If you are having trouble with the recovery process, please contact official documentation Apple for step-by-step instructions.